Back again with another tutorial. This time I am showing how I save my layouts to view on the internet and in all the galleries online. Ok here we go!
Step One:
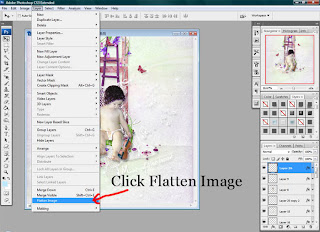
If you haven't flattened your layout yet, you need to go up to the top toolbar and click on Layer and then down to Flatten Image as shown in the image below.
Step Two:
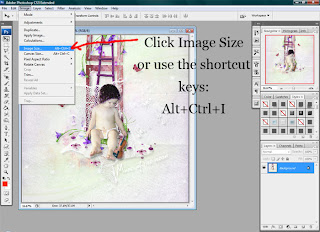
Now you need to go back up to the top toolbar and click on Image and then down to Image Size or to make it quicker use the shortcut keys, Alt+Ctrl+I as shown below.
Step Three:
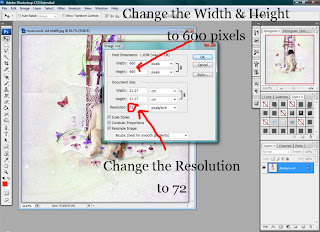
Now you need to change the Resolution from 300 to 72 in the Document Size and then you need to change the Width and Height from 3600 pixels to 600 pixels in the Pixel Dimensions as shown below and hit the OK button.
Step Four:
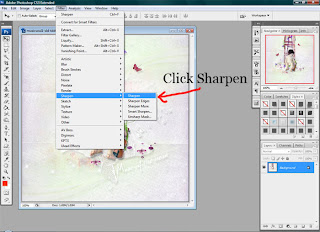
Now that your page has been resized down to 600X600 pixels you need to go up to the top toolbar again and click on Filter and then down to Sharpen and then click on Sharpen as shown below. This will sharpen your layout and give it a beautiful crisp look so it still looks gorgeous when you upload it to a webpage or gallery online.
Here is an example of my non-sharpened layout that has been saved for the web:

And here is an example of my sharpened layout that has been saved for the web:

Step Five:
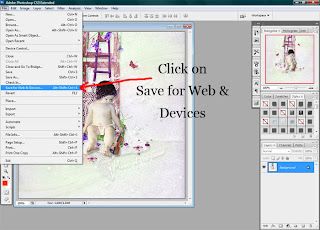
Now all you need to do is save your layout. To do this you need to go up to the top toolbar again and go to File and then down to Save for Web & Devices as shown below.
Step Six:
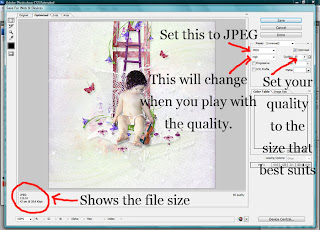
Now in the window that pops up you need to change the settings. You need to set the image type to JPEG, Quality to anything that keeps the file size down but keeps the layout looking beautiful. I usually work around 60. For this one though I have 65. As you play with the Quality you will notice on the bottom left side that you can see the size of the file. I change the Quality to get a good size so that is acceptable in all galleries, as shown below.
Step Seven:
All you need to do now is hit the Save button and your done. Now you can go and upload your layout into all the galleries and show off all your gorgeous work or onto your blogs, well pretty much all over the place. LOL! Enjoy and I hope this helps :)
Step One:
If you haven't flattened your layout yet, you need to go up to the top toolbar and click on Layer and then down to Flatten Image as shown in the image below.

Step Two:
Now you need to go back up to the top toolbar and click on Image and then down to Image Size or to make it quicker use the shortcut keys, Alt+Ctrl+I as shown below.

Step Three:
Now you need to change the Resolution from 300 to 72 in the Document Size and then you need to change the Width and Height from 3600 pixels to 600 pixels in the Pixel Dimensions as shown below and hit the OK button.

Step Four:
Now that your page has been resized down to 600X600 pixels you need to go up to the top toolbar again and click on Filter and then down to Sharpen and then click on Sharpen as shown below. This will sharpen your layout and give it a beautiful crisp look so it still looks gorgeous when you upload it to a webpage or gallery online.

Here is an example of my non-sharpened layout that has been saved for the web:

And here is an example of my sharpened layout that has been saved for the web:

Step Five:
Now all you need to do is save your layout. To do this you need to go up to the top toolbar again and go to File and then down to Save for Web & Devices as shown below.

Step Six:
Now in the window that pops up you need to change the settings. You need to set the image type to JPEG, Quality to anything that keeps the file size down but keeps the layout looking beautiful. I usually work around 60. For this one though I have 65. As you play with the Quality you will notice on the bottom left side that you can see the size of the file. I change the Quality to get a good size so that is acceptable in all galleries, as shown below.

Step Seven:
All you need to do now is hit the Save button and your done. Now you can go and upload your layout into all the galleries and show off all your gorgeous work or onto your blogs, well pretty much all over the place. LOL! Enjoy and I hope this helps :)


0 comments:
Post a Comment