G'day G'day Everyone!
I am back but this time I have a tutorial! hehehe! My friend Joan requested a tutorial on how to get all those gorgeous but rather LARGE layered layouts saved and ready to go on disc so I thought, why not share it with everyone else too. :)
This is what I do to save and preserve my layouts, might not be what everyone else does but I am so set in my way and it works perfectly for me. AND more importantly, it saves more space on your computers to be able to put more and more kits on it to scrap with. hehehehe!
Oh and before I start, I make all my layouts as 12x12 inches with a resolution of 300dpi/ppi but this will work on any sized layout that you make. Ok here we go! LOL!
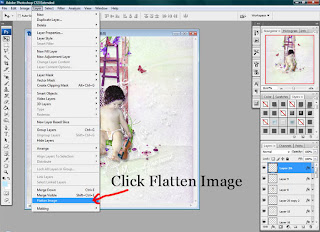
Step One:
Once you have finished making your layout you need to go up to the top toolbar and click on Layer and then down to Flatten Image as shown in the image below.
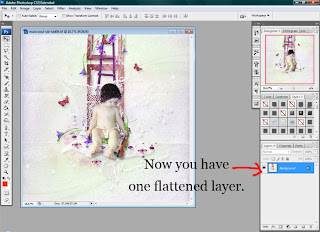
Step Two:
Now you have only one flattened layer in your Layers Palette as shown in the image below.
Step Three:
Now you need to go back up to the top toolbar and click on File and then down to Save As. OR to make it quicker you can use the shortcut, Shift+Ctrl+S shown in the image below.

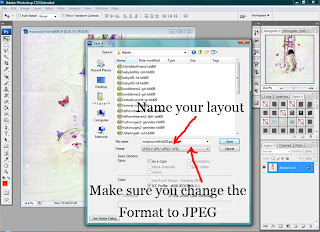
Step Four:
You will now need to name your layout in the File Name field and once you name it make sure you change the Format to JPEG as shown below.
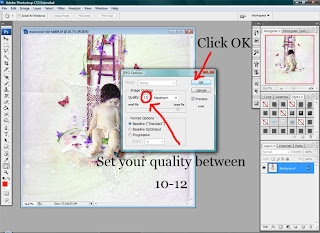
Step Five:
And one more final step. You will now need to set the Quality to anything between 10-12. I have had layouts printed with all 3 settings and they have all come out so perfect and identical so there isn't that much difference. Now click OK!! All shown below.
That's it, all done!! Your beautiful layout is now ready and prepared to go onto a disc with the rest of your gorgeous pages to preserve your amazing work! Enjoy and hope this helps out. :)
I am back but this time I have a tutorial! hehehe! My friend Joan requested a tutorial on how to get all those gorgeous but rather LARGE layered layouts saved and ready to go on disc so I thought, why not share it with everyone else too. :)
This is what I do to save and preserve my layouts, might not be what everyone else does but I am so set in my way and it works perfectly for me. AND more importantly, it saves more space on your computers to be able to put more and more kits on it to scrap with. hehehehe!
Oh and before I start, I make all my layouts as 12x12 inches with a resolution of 300dpi/ppi but this will work on any sized layout that you make. Ok here we go! LOL!
Step One:
Once you have finished making your layout you need to go up to the top toolbar and click on Layer and then down to Flatten Image as shown in the image below.

Step Two:
Now you have only one flattened layer in your Layers Palette as shown in the image below.

Step Three:
Now you need to go back up to the top toolbar and click on File and then down to Save As. OR to make it quicker you can use the shortcut, Shift+Ctrl+S shown in the image below.

Step Four:
You will now need to name your layout in the File Name field and once you name it make sure you change the Format to JPEG as shown below.

Step Five:
And one more final step. You will now need to set the Quality to anything between 10-12. I have had layouts printed with all 3 settings and they have all come out so perfect and identical so there isn't that much difference. Now click OK!! All shown below.

That's it, all done!! Your beautiful layout is now ready and prepared to go onto a disc with the rest of your gorgeous pages to preserve your amazing work! Enjoy and hope this helps out. :)


1 comments:
thankyou Tara lee.. that should be a real help.. xxxx... and might I had what a wonderful tut.. very professional
Post a Comment